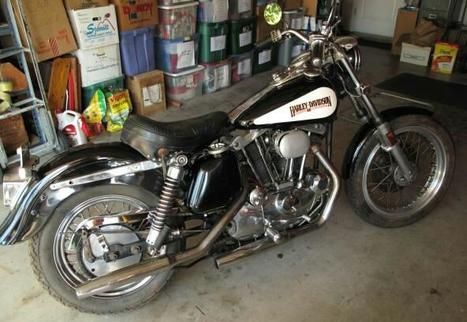
1974 Harley Davidson XLH 1000
Purchase Date: September 2016
|
I recently took advantage of an opportunity to trade the 68 BSA Starfire 250 for a non-running Harley Davidson XLH.
The '68 BSA had been up for sale / trade for some time on Craigslist. My price point is fair, although I'm always willing to take a trade for something of interest. I refuse to take too much of a loss on the builds, the bike can sit as long as it needs to before a sale.
This is where the XLH comes in. I've noticed the Harley under an ad with "not running" and "willing to trade" within a Craigslist ad. The price was in the same range as the BSA and I'd like another Harley in the garage, therefore I sent the owner an inquiring email. I didn't expect the owner to have any interest in swapping the American bike for British, although to my surprise he was excited about the option and the negotiations began.
|
The exchange was cut and dry, overall fairly simple with both owners happy. The BSA was too small for me and I can have some fun with the Sporty, I was happy. Plus, I'm hoping to recoup some of the costs I dropped into the BSA when I eventually sell the Harley.
The 1974 AMF Harley Davidson XLH has a 997.0 ccm (60.84 cubic inches) air cooled v-twin engine. The four stroke power plant puts out 57 horsepower @ 6000 RPM. Top speed is listed at 112 mph. The two overhead valve engine has a compression of 9.0:1 with a bore and stroke of 3.2 x 3.8 inches. The 4 speed gearbox has a chain final drive. Stopping power is a simple single disc up front and drum in rear. Original gas tank fuel capacity is just 3.96 gallons. This small size bike comes in heavy at 529.1 lbs.
The main problem with the Harley is that the clutch is not dis-engaging. Other issues include the bike running a bit rich, and not to mention the sizable amount of oil left underneath the bike after sitting for a few weeks. None of these issues appear to be a showstopper.
October 2016
After initially going over the bike, I find the usual nuances with most of the motorcycles I buy. It needs a good once over, sort of a tune up. The Cables are dry and poorly adjusted, oil(s) appears old, chain dry and adjusted incorrectly, poor brakes, cables routed incorrectly, rusted over ground contacts, etc... Basically these are all the signs of a the backyard mechanic pretending to know what they are doing. Often selling off the bike because something isn't working correctly, when in most cases the bike just needs a good tune up.
Oil Drain Plug: A previous owner installed a speed drain plug. The style with a larger bolt fitting to the sump and a smaller tapered thread bolt screwed into the bottom of the larger bolt. It appears the bad oil leak is from the sealing surface of the larger bolt mating to the sump. I removed the bolt finding plumbers tape wrapped around the threads and no crush washer. Whilst mumbling profanity to myself, I unraveled the plumbers tape and added an aluminum crush washer. Next I removed the smaller taper bolt, also finding plumbing tape. I cleaned it up and reinstalled. The leak has been rectified. I wish all of the problems I run across can be fixed this easily.
November 2016
Clutch: The clutch is frozen, I expect this to be something simple like a poor cable adjustment. I cleaned, greased and oiled the dry clutch cable. Then, I adjusted the pressure plates through the engine case to the proper specification. Clutch free play is perfect at the lever. The wheel is not spinning completely free with the clutch engaged, although it is much better than initially because I can force the tire to spin. The clutch is working properly although the plates appear to be sticking together. I'm going to leave it like this for a test drive hoping they free themselves under load.
Fluids: After the clutch adjustment, I drain the primary oil finding that the previous owner had the primary oil filled to the fill cap! Proper fill is to the level screw on the side of the case. This might explain problems with the clutch. I filled all fluids to their recommended levels.
December 2016
Electrical: I removed the tank / speedometer cover plate to reveal a rats nest of wiring. Some of the wires were cut, some connections loose and some completely disconnected. I spent some time tidying up the mess to prevent any possibly electrical gremlins.
Carburetor: The previous owner mentioned that the carburetor will need to be sorted out. The carburetor on the bike is a Zenith Bendix type with and adjustable main jet. The manual I have does not list the stock settings for the "adjustable" carb, therefore I did some research online. I found that a good starting point is one turn out for the idle screw and four turns for the jetting screw. I'll adjust these again to my liking after I start and warm up / drive the bike. The hose clamps over the rubber mounts from the carb to the cylinders were both loose, I re-secured the hose clamps.
Brakes: I've noticed that the front brake is terribly weak and it is on my list inspect closely. First off the disc is filthy, whom knows what the black crud on the disk is from but this can be part of the problem. I cleaned off the disk with acetone. The previous owner replaced the brake cylinder, all the while making a fuss as to how much he paid for the replacement. The brake felt spongy to me, which typically means there's air in the line. I bled the line with fresh fluid, flushing the trapped air through.. and sure enough there WAS trapped air in the line. Once the air came through I knew the brake would be much better. After sealing it all up the brake felt much stiffer and stops the bike as it should.
Final Drive Chain: The chain was tight and dirty. I loosened the chain to within spec followed by a good cleaning and re-lubing.
Initial Test Drive
The bike started up with no problem. A little smoke billowed out as expected, this will typically burn off. The idle was a bit high, I made a few idle and throttle screw adjustments where the bike set itself at a nice steady v-twin rumble.
Knowing the clutch plates were stuck together, I decided to push the bike in neutral then jump on and shift into 1st.. then pull the clutch back in and come to a stop. In theory, this should force the clutch plates free. I did exactly that and came to a stop with the clutch working perfectly.
Next, I drove up the street testing the gearbox, which worked perfectly. This bike has snot! I came back to the house with the bike idling, making more carb adjustments.
I then decided to take a good spin around the neighborhood. I pulled out jamming through the gears and got about three blocks away when the bike made a few spitting sounds (not good sounds). Instinctively I hit the kill switch and pulled in the clutch, where I came to a stop after coasting to the curb. Looking down I noticed the entire carburetor fell off the bike and is dangling by the cable / fuel line. I couldn't believe it. This was a first for me where the carburetor fell off! Ha.. wow. Okay.. So I pushed the bike back into the garage with a makeshift brace for the carburetor, I will have to do some research on this one as to what is going on with the manifold brackets.
January 2017
Carburetor: After my last incident with the carburetor "falling off", I've discovered that a previous owner did not have the correct year manifold clamps. I ordered and installed the correct clamps and manifold seal rings for the carb assembly. To offset the weight of the carb and air cleaner, I've also ordered and installed a carb support bracket from lowbrow customs to hold the carb / air cleaner weight.
I took the bike out for a successful test drive with the new carb clamps and seals. Unfortunately I'm still having a backfire condition under load through the air cleaner. Jetting adjustments with the main and idle screws will not clear the misfire. I suspect an air leak in the carb, possibly the accelerator pump. I will look into this and take it from here.
I've replaced the accelerator pump and the misfire condition is still there. During idle, I discovered the intake still has a leak. I adjusted the cylinders to line up better with the intake manifold and voila, leak is gone.
February 2017
Battery: I've been having difficulties with the battery not holding charge. It will only allow me to crank over the starter for a few seconds before dying out. I have to charge the battery every time I attempt to start the bike. I did a load check and sure enough, it is a bad battery. I sourced and installed a new Yuasa YHD-12H battery.
I haven't become attached to the Harley, and I've got other projects of higher priority to take care of. Therefore I've decided to sell the bike. The Sportster went to a local owner whom will give the bike the time and attention it deserves.
Sale Date: February 2017