1953 AJS 18S
Purchase Date: June 2016

|
Some time has gone by since I’ve managed to get all of my motorcycles in good driving operation. I’ve been finding myself ogling bikes on Instagram and at motorcycle events more than usual. It is time to find another project. I’ve been tossing around the idea of finding a British post-war bike to customize.
The last motorcycle event I’ve been to was the BSA all British Clubmans bike show. Over the years I’ve gained a new respect for British motorcycles, working on Hillary’s B25 Starfire also has something to do with that. I’ve owned a ‘65 Triumph some time ago in which the project itself was a good distraction to help me through some difficult times. These memories enforce the idea of my finding a British motorcycle for the next project.
|
The peak of the British motorcycle boom appears to be somewhere between 1950 and 1970. This is just before the low cost, low maintenance and high performance Japanese models dominate the industry. British motorcycles of this era emanate a presence unlike any other. They tend to be proper and stuffy while at the same time loud and messy with oil leaks all over the place; a very bold existence (right up my ally).
My latest project search is for a British pre-unit, post-war motorcycle. Preferably something to customize and refurbish, not a full restoration.
As usual, I begin my searches over the internet. Expensive un-restored and really expensive restored older BSA’s and Triumph’s are easier to find than what I’m looking for. I am not in a hurry, therefore I’ve got to retain control of my patience and not purchase something I would regret down the line.
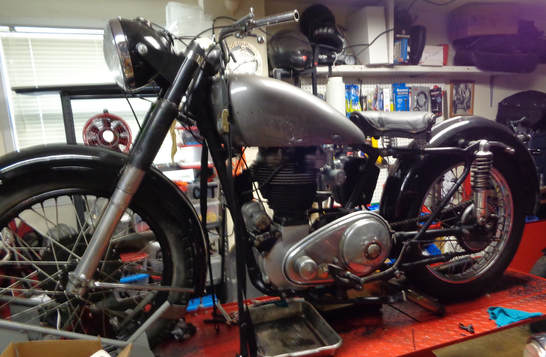
After several weeks of searches, I’ve got a Craigslist posting hit for a 1953 AJS 18S. The bike is missing most of the bodywork although the engine appears solid with a period correct frame. The price is right, therefore with slight hesitation I send a message to the seller asking a few titling questions. A few days go by into the transaction progress, and before long I find myself with the AJS sitting proudly in the garage.
AJS stands for A. J. Stevens & Co. Ltd, which was originally a firm from England that sold both motorcycle and automobiles. The firm was in existence from 1909 to 1931, before the end of their succession 117 motorcycle world records had been granted. The name was still used up until 1969 before the company's resale in 1974. The name "AJS" is still used today for small capacity motorcycles and scooters out of the UK. For more information, Wikipedia can be a good resource.
The four stroke AJS has a large 82.5mm bore single piston with a bold 93mm stroke totaling a 498cc volumetric output. Compression ratio is only a 6.0 due to the poor quality gas which was the only thing available to the public after WWII. These weren't high compression race bikes although reliability and easy starting proved efficient and gained popularity. The AJS has a 6 Volt Lucas magneto / dynamo charging system with positive to earth grounding. Dry weight is 392.4 lbs. The bike has a four speed gearbox with a wet, multiple disc clutch assembly. Fuel capacity is 3.57 gallons.
Under my first inspection, the bike looks solid with a few missing parts here and there. Leaky gaskets, some very old dry mud. I am excited to dive into the AJS project. My plans for this is to do a light refurbishment, drive the bike for some time and sell. Basically to bring the AJS back to life.
My first step is always to clean up the bike and go over the motor, drivetrain, cables and electrical. This particular bike is run off a Lucas magneto ignition system, no battery required. If you want to run a headlight and taillight a dynamo and battery can be added. My plan is to add an LED "total loss" system where I can charge the batteries like a cell phone. The battery will hold a charge for several hours with all the lights on. This setup will allow me to keep the bike simple and neat.
So far, my list of tasks include:
- Purchase and paint both front and rear fenders
- Strip and re-paint the gas tank
- Replace or repair all of the cables
- Replace tires, check brakes
- Inspect engine, valves, primary + drive chains, clutch
- replace all fittings and hardware that are worn, stripped or leaking
- flush all fluids
- re-build or replace carburetor
- replace all leaking gaskets and seals
Where to start, lets make the bike run or at least start and idle. I Inspected the valves to find they are fine just where they are. The magneto fires spark, weak 6V - but it's a spark nonetheless. Clutch feels fine, kicks through and grabs well. Rebuilt part of the carburetor so it holds gas. I flushed the fluids with oil leaking all over the place. After a few kicks with some smoke and fury, the old AJS started. Smoke filled the room along with gunshot bangs and spitting exhaust leaks. Can this be any more exciting! The bike is alive, nothing major to immediately attend to. I can now dive in and make this old bike a proper driver again.
September 2016
|
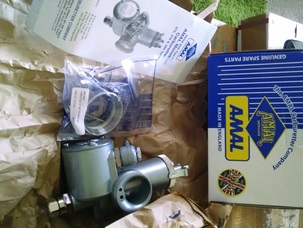
Carburetor: I've taken the original carburetor apart a few times trying to get the float working correctly, in the mean time dealing with bad gaskets and stripped hardware throughout. It was then I decided to do some research on the carburetor finding out that the Amal, currently on the bike, is for a BSA 441 Victor. This is not an exact match for the bike I've got, and I'm having troubles with it. In this case, I've opted to purchase a new carburetor (or new- used).
After doing some searches and some emails to Amal in the UK, I've discovered that I can get a brand new one already jetted for the bike straight from the factory for a reasonable cost. I happily purchased and installed the carburetor. The motorcycle fired right up. After a few adjustments to the air / gas mixture and idle screws, the bike settled to a nice thumping idle. |
|
October 2016

|
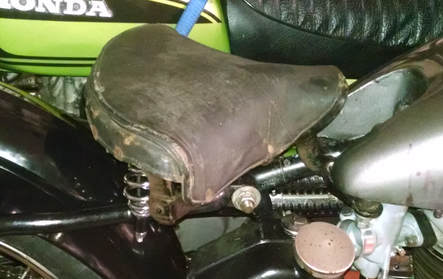
Seat: The obvious choice for a seat is to go with the original hard mounted or a Lycette spring style. After reviewing these seats including cost and appearance, I've opted to make my own low solo seat. I purchased the pan with a style I like from eBay. I then covered the seat pan with foam and black vinyl material which I riveted to the pan. I mounted the seat to the existing hole in the frame with short 3/4" load rated spring cushions.
|
November 2016
|
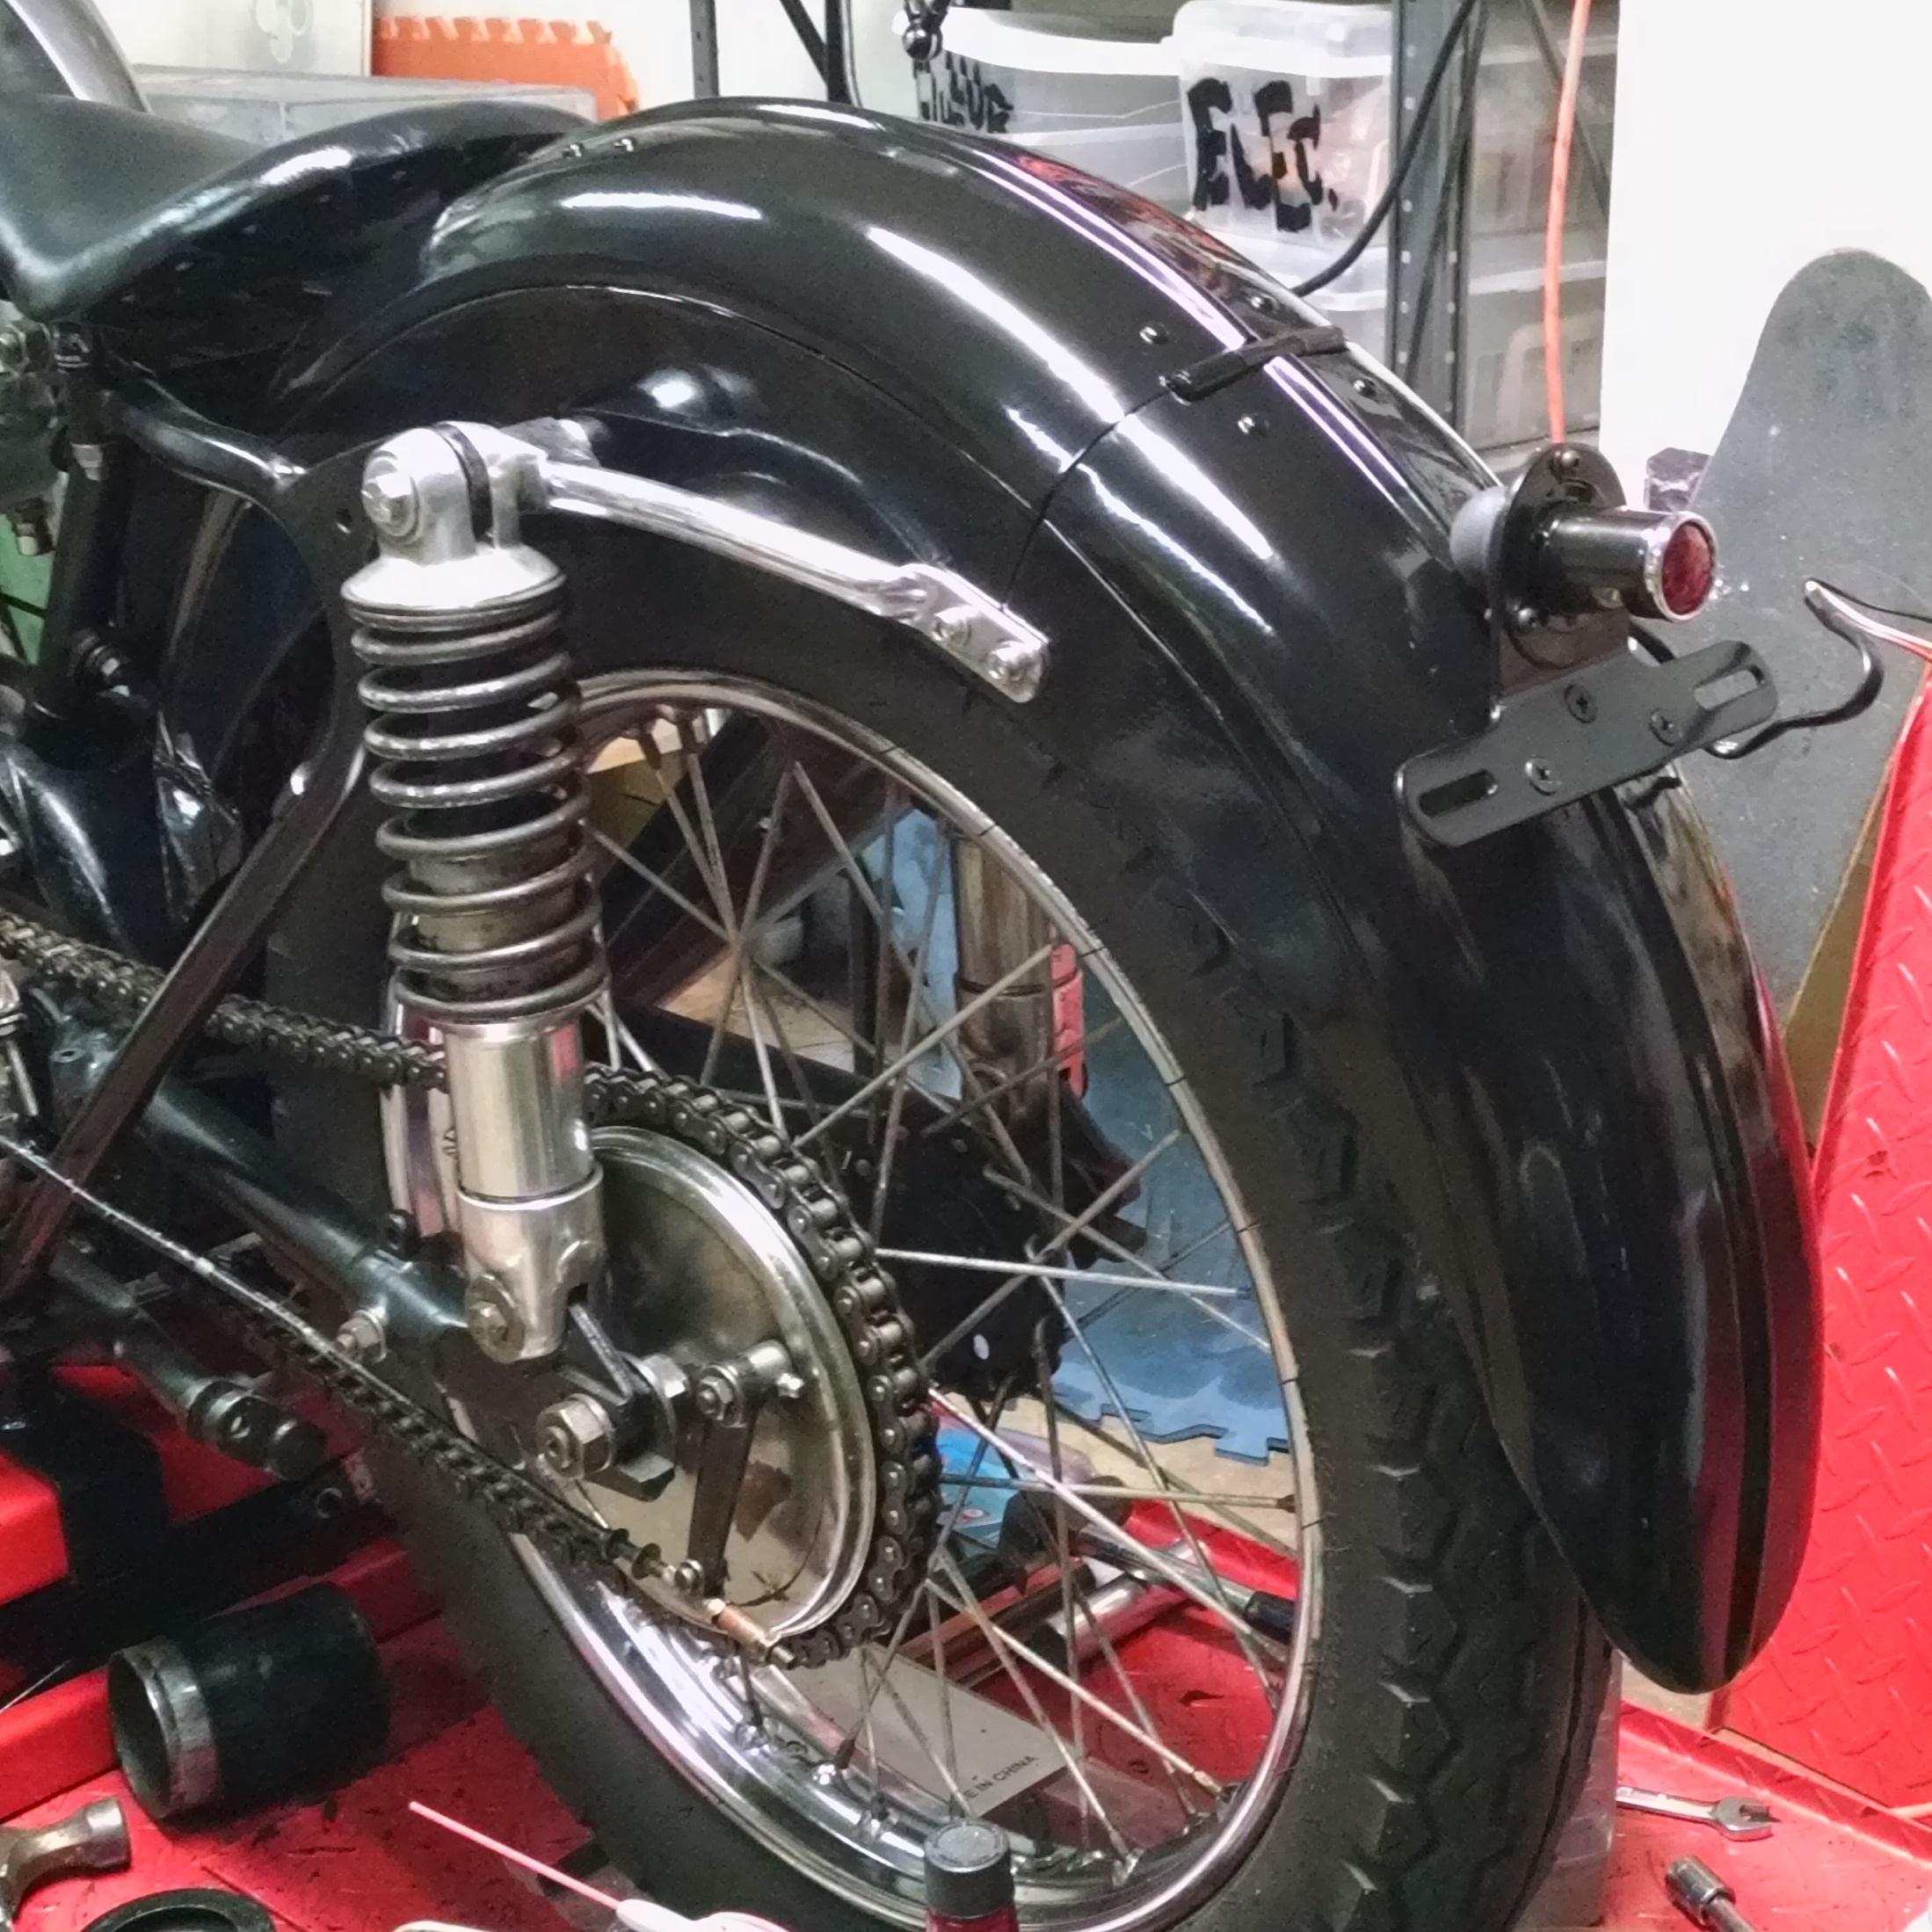
Fenders: I sourced and purchased front and rear period correct fenders. I then took them to a local shop for the gloss black powder coating. The installation did not go as smooth as I would have liked, all of the holes did not line up. After some bending and drilling, I finished installing the fenders and they look great.
Tail Light: I sourced a period correct LED tail light / license plate bracket. I chose LED's because I am planning on installing a total loss battery system for the lighting. The tail light was sourced from a manufacturer in England.
Speedometer: I sourced and installed a Smiths reproduction speedometer.
Headlight: I sourced the headlight eBay. It is a good reproduction of the 6V OEM style, including ammeter and on / off switch.
Gas Tank: There was some slight rusting on the inside of the tank near where the emblems mount. I decided to use Red Kote tank sealer inside the gas tank to prevent from further rusting, also to eliminate any possible rust chips from clogging the petcock filters.
|
|
January 2017
|
Seat - Update: I came across and purchased a really nice period correct Terry made British seat on eBay. The seat makes the bike look much better than the one I originally made for the bike. The project is slowly coming along, albeit nicely.
|
February 2017
Headlight / Fork Tubes: In order to install the new headlight and mounting ears, I had to drop the fork tubes.
They were simple enough to remove, although re-installing has proven to be difficult due to the interference fit into the crown. There is no easy place to grip the tube hidden under the spring covers to get enough leverage for re-installation.
I made a makeshift collar with rubber base to help with clamping the tube while heating the crown insertion with a torch. I was able to get the tube close to the crown, where the cap would theoretically take over with it's threads would pull the tube into place, although it wasn't close enough.
I then sourced a tool with the same 1"-20 thread as inside the top of the fork tubes. Using the tool, I pulled the tubes into place letting the fork caps snug the tubes as required. The previous owner did not have one of the fork tubes installed into the crown at all, probably because of the same difficulties I had. The scoring on the tubes under the ears also displays evidence of a struggle.
January 2018
|
The AJS is coming along, slowly but surely. Some momentum was recently acquired from a scheduled appointment to the California DMV.
--- Update. The AJS made its way through the DMV system with flying colors and I have the title in hand. You never know how the process will go. The trick is to make sure all of the paperwork is clear, concise and complete. February 2018
Oil Circulation: The oil feed and return lines were badly bent out of shape. I took on a small copper tubing - bending project, sourcing multiple fittings trying to find the right set. I was successful and the new copper lines look great. I'll see if there are any leaks after everything goes together. I have a feeling I'll be pulling it apart again, that's how these projects go!
|
|
April 2018
Electricity: I've decided to run a total loss battery system. I am using a small battery, I don't need cranking amps due to the dynamo running the engine. The battery will power an LED brake/tail light, the horn and 6V headlight. Being the age of the bike I can run with the headlight off. I will have a 12V/6V converter in line before the headlight switch. The battery will be able to run with the brake light / headlight for 6-8 hours easy before a recharge. I am running a small SAE connector for easy plug in charging.
Tool Boxes / Battery Holder: I had a difficult time finding the tool boxes and battery holder here in the states that were reasonably priced. I don't need the original set, a reproduction will do just fine for this build, therefore I ended up sourcing them from India. The shipping time was 6-8 weeks although the parts are good. The sheet metal work needed some filler before painting, otherwise no complaints - usable equipment. I drilled the mounting holes, cutout for the voltmeter + switch and mounting holes for the power converter. I am currently in the painting process, gloss black for everything.
Make it Black: Everything that requires painting is getting a fresh coat of gloss black Rustoleum paint.
May 2018
Electricity: I finished up the electrical details. There was a minor hang up with the headlight switch, I had to install an additional 6 volt relay to make the low / off portion work properly. Everything works great now and I'm happy with the outcome.
I took the bike out for it's maiden voyage around the neighborhood. It is loud! - I sense a baffle in the near future.. The right side shifting with 1 down and 3 up is an odd one. The manual advance is also something I will have to get used to. Other then these small details, and the bike oiling the pavement everywhere it goes it is a blast to ride. One big problem is the gearing is super low. In a previous life, the bike was used for trials. I knew this but wasn't sure how bad the gearing would be. It's pretty bad, or low (tall) should I say. Next I am going to dig into the spares catalog and research the stock gearing, try to make it a bit more street friendly.
Quiet Time: Indeed the bike was too loud. I scared too many neighborhood children... I installed a simple 3/4" x 8" baffle and it brought the noise down just enough; not too quiet and not too loud. A minor carburetor adjustment was required, as expected.
August 2018
Gearbox: After inspecting the primary gear, I found: a broken cam absorber spring; an 18 tooth sprocket welded to the cam; and a makeshift spacer. I sourced the correct replacement parts from all over the place. Most of the bits came from Andrews Engineering (UK); and quickly too. I also ordered some items from British Only Austria. The new sprocket from Andrews is a 22 tooth version, installation of all the parts went easy, it all fit together well. I installed a new heavy duty primary to gearbox chain sourced from good ol' McMaster Carr; the go to for random needed hardware and miscellaneous bits.
October 2019
Magneto: Spark has been intermittent and the Brit bike has not been running well. The fist and most common thing to check is always the condenser. This is buried deep inside the Lucas magneto. This AJS utilizes the N1 model. I've decided to disable the existing condenser using the "condensectomy" method and add an EasyCap condenser. While tearing into the magneto, I had difficulties removing the outer bearing race. These bearings are cheap... I decided to destroy the bearing inner race with a homemade bearing clamp pulling system and replace with a new race/bearing assembly. Re-assembly alignment is critical. I took a risk by adding a few marks on the outside shell before disassembly and voila, everything lined up perfectly while putting back together.
All in all, the condensectomy was not exactly simple and not recommended for the beginner. There are lots of places to goof this one up.
I am grateful for the EasyCap system, it works well and saved me from sending out the unit for an expensive rebuild. The bike now runs like a champ. I have to get back to taking care of some of those oil leaks.
December 2019
Wet Sumping: The AJS had a horrible wet sump problem since the day I bought it. I sourced an 8mm inline check valve from the UK that surprisingly, completely solved my oil leaks. I was close to beginning a complete rebuild before trying the check valve, I'm glad I tried this quick fix.
Chains, Cables: I tightened the main drive chain again, it's close to the end of it's life - stretched out. I also added another speedometer cable, the first one broke. Sometimes the new-old stock parts don't hold up from sitting around on shelves over the years. Lets hope the new cable works out; if not I'll be hunting for something else that may be causing these to break.
March 2020
Tires: The front tire has been on the motorcycle for a long time. I purchased and installed an inexpensive vintage style Duro HF314 tire as a replacement. This motorcycle will not see California freeways on my time, the four ply Duro works great on back roads and around town.
Mirrors: The small chopper style mirror tucked inside the bar looked good although I couldn't see very well using it. I sourced and installed an above bar 3.0" round replacement which does the job.
July 2021
I've enjoyed the AJS for over 5 years. That's a long stretch for a bike (for me). I have my eye on something else, and I could use the cash. The AJ is going up for sale.
I will miss "thumping" around the neighborhood. Running short errands will never be the same (until I get another bike of the same era).
I will miss "thumping" around the neighborhood. Running short errands will never be the same (until I get another bike of the same era).
August 2021
The motorcycle sold to a local collector. He has several British bikes of the same era, he will be bringing this back to original condition. He's lucky, it's already a great runner!
Sale Date: August 2021